CoSciN on a Laptop
The Gates CoSciN testbed is a good QA environment, mimicking the production environment very closely. At times you might want to do experiments on something smaller.
Faced with a similar situation in other networks, you’d reach for VirtualBox, Mininet and a generated topology in Python. This won’t work to model CoSciN because:
-
CoSciN is actually two SDN network works with a bunch of infrastructure in the middle. Mininet can only model one SDN network at a time.
-
While you could split the work among VirtualBox VM’s, it becomes unworkable fairly quickly. You could use three VirtualBox VM’s: two to model each side of the CoSciN network, and one for the router. But then each of the non-router VM’s must have an OpenFlow switch (OpenVSwitch is the natural choice), host software, and the controller running inside of the VM. The CoSciN controller must be changed to fit these circumstances, and the result is pretty slow.
We’ve found the most accurarate way to emulate CoSciN is to use KVM-based virtual machines on an Ubuntu box. KVM virtualization is very fast, relying on an hypervisor embedded directly in the Linux kernel. It’s easy to spin up 3 VM’s - two hosts and one router - whose network configurations mirror real-world equivalents. The secret sauce is in the switches and controller, which can run on the host and connect the VM’s through Private Bridge networks. Keeping the controller on the host makes development and debugging easy: you don’t have to do complicated restarts of the infrastructure.
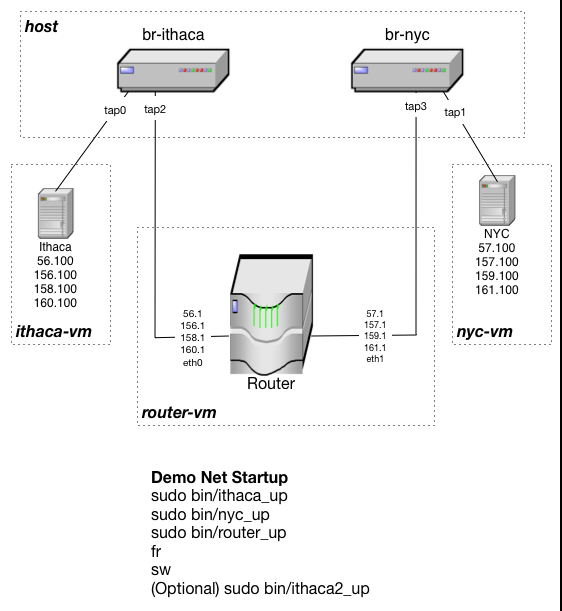
In the above diagram, all IP addresses are assumed to be in the private class-B space, so “56.100” means “192.168.56.100”.
The only artificial thing here is you have one SDN controller running, while the production CoSciN network has two. But it’s actually a blessing, since we want the controller source code to be identical on both sides of the CoSciN network. Whether it acts as the “Ithaca side” or the “NYC side” should be discovered by the software itself, not hard coded in the configuration or source code. By modelling it on this laptop network, it forces you to consider both sides of the network at the same time. This proved to be helpful in the design stages.
Installing KVM-based VM’s
To install, start with an Ubuntu-based host. We’ve tested on an Ubuntu 14.04 desktop setup with 8 GB RAM. The host must have a wired ethernet coonnection to the Internet. User-mode networking in KVM will not allow VM’s to bridge to a wireless ethernet conneciton.
Then:
$ sudo apt-get update
$ sudo apt-get install git
$ git clone http://github.com/coscin/laptop
The GitHub repository for this is viewable at http://github.com/coscin/laptop, of course.
All of the KVM images will use the same username ubuntu with the password preconfigured in the laptop/install
script. You may want to change it to suit your purposes.
The following will run a few minutes because it grabs the Ubuntu Cloud Server 15.10 image from the Internet (which is about 300 MB).
$ cd laptop
$ ./install
$ cd ..
$ source .profile
$ newimg ithaca
$ newimg nyc
$ newimg router
The host VM’s ithaca and nyc normally access the private network you’re building, but not the
Internet. Fortunately, the VM’s have a dormant network interface “eth1” that provides a bridge to user-mode
networking and an Ethernet connection. You merely need to bring eth1 up, install software or whatever you need to do
with the Internet connection, then bring it back down (which
is important because CoSciN traffic must use the tap as a default route.)
To do this on Ithaca:
$ sudo bin/ithaca_up
This might take five minutes because there’s no network configuration and the discovery process takes five minutes to time out. Then login as ubuntu, and you’ll be running the VM directly in your terminal window.
ubuntu@ithaca$ sudo hostnamectl set-hostname coscintest-host-ithaca
sudo: unable to resolve host cosscintest-ctrl-ithaca
ubuntu@ithaca$ exit

Ubuntu 15.10 coscintest-host-ithaca ttyS0

coscintest-host-ithaca login: ubuntu
Password: *******

ubuntu@coscintest-host-ithaca$ sudo nano /etc/network/interfaces.d/eth0.cfg
Copy the following into eth0.cfg:
# The primary network interface
auto eth0
iface eth0 inet static
    address 192.168.56.100/24
    gateway 192.168.56.1
And the following into eth1.cfg (same directory):
iface eth1 inet dhcp
  up ip route replace default via 10.0.2.2
  down ip route replace default via 192.168.56.1
You can test the Internet connection if you wish by bringing up eth1:
ubuntu@coscintest-host-ithaca$ sudo ifup eth1
ubuntu@coscintest-host-ithaca$ sudo apt-get update
The apt-get ensures your Internet connection is good (unfortunately, Ping doesn’t work across KVM usermode networking, so don’t even try it.) Before you start testing, however, you must shut down the Internet connection:
ubuntu@coscintest-host-ithaca$ sudo ifdown eth1
ubuntu@coscintest-host-ithaca$ sudo reboot now
Then start up another terminal window, and do the same thing with the nyc host VM,
using coscintest-host-nyc for the hostname and 192.168.57.100 for the IP.
Finally, in a third terminal window, start up the router VM:
$ sudo bin/router_up

ubuntu@ubuntu:~$ sudo hostnamectl set-hostname coscintest-router
sudo: unable to resolve host ubuntu.localdomain
ubuntu@ubuntu:~$ exit

Ubuntu 15.10 coscintest-router ttyS0

coscintest-router login: ubuntu
Password:

ubuntu@coscin-router$ sudo nano /etc/network/interfaces.d/eth0.cfg
eth0.cfg should look like this:
# The primary network interface
auto eth0
iface eth0 inet static
    address 192.168.56.1/24

iface eth0 inet static
    address 192.168.156.1/24

iface eth0 inet static
    address 192.168.158.1/24

iface eth0 inet static
    address 192.168.160.1/24
And eth1.cfg should look like this:
auto eth1
    iface eth1 inet static
    address 192.168.57.1/24

iface eth1 inet static
    address 192.168.157.1/24

iface eth1 inet static
    address 192.168.159.1/24

iface eth1 inet static
    address 192.168.161.1/24
Finally, you should turn on IP routing by editing the file /etc/sysctl.conf and uncommenting the following line:
# Uncomment the next line to enable packet forwarding for IPv4
net.ipv4.ip_forward=1
Then reboot the router as you would a normal Ubuntu server with sudo reboot now. Your VM configuration is now complete!
Installing RYU CoSciN Controller
You install RYU and the controller software on the host just like you would a production one, using the directions in the first section of Infrastructure Technical Details - Creating Controllers and Measurement Hosts. You can skip the Zookeeperd installation if you wish, since in the laptop configuration you won’t be doing any clustering.
You should use a laptop-specific CoSciN configuration file. You can use coscin_laptop_testbed.json
as a template. Notice that the zookeeper attributes in this file are blank - this configures CoSciN not
to use Zookeeper at all. The controller_hosts attributes in both the NYC and Ithaca sides should be
changed to match the host name of your laptop. Finally, change the /etc/init/coscin-app-ryu.conf file
to point to the correct configuration file coscin_laptop_testbed.json.
Now you’re ready to run the CoSciN App for the first time - see the section Running the Network below for the
required steps. However, the first run most likely won’t work correctly.
Two OpenVSwitch bridges named br-ithaca and br-nyc were created as part of the install processes, and were given random
datapath IDs. You will see a messages like this in the log:
   `2016-03-16 10:38:11.488 INFO CoscinApp Switch 378372418241536 says hello.`
   ...
   `2016-03-16 10:38:11.488 INFO CoscinApp Switch 82734059872304 says hello.`
Then you need to add this DPID to the coscin_laptop_testbed.json file. Generally the first listed switch is
the DPID for Ithaca and the second for NYC, but if this doesn’t work, NYC won’t be able to ping Ithaca and vice-versa.
In that case you just swap the DPID’s and it should work.
Running the Network
You must start up the VM’s in the following order, so that the network interfaces will be assigned correctly. You should run them all in separate terminal windows.
$ sudo bin/ithaca_up
$ sudo bin/nyc_up
$ sudo bin/router_up
Then you can start up the CoSciN app on the host:
$ sudo service coscin-app-ryu start
To test the connectivity, login to either the coscintest-host-ithaca VM or the coscintest-host-nyc VM and ping the other:
ubuntu@coscintest-host-ithaca$ ping 192.168.57.100
ubuntu@coscintest-host-ithaca$ ping 192.168.157.100
Finally, to shut down VM’s, use the Ubuntu standard sudo shutdown now on each. I usually shutdown in the reverse order the VM’s
were started, but that’s probably not necessary.
Installing Frenetic CoSciN Controller
You install Frenetic and the controller software on the host just like you would a normal one, using the directions at https://coscin.github.io./website/frenetic-controller.
There are scripts in ~/bin to make easy work of this. The first thing you’ll need to do is tweak the configuration file.
Two OpenVSwitch bridges named br-ithaca and br-nyc were created as part of the install processes, and were given random
datapath IDs. You will see these when you run Frenetic for the first time:
$ fr
$  [INFO] Calling create!
[INFO] Current uid: 1000
[INFO] Successfully launched OpenFlow controller with pid 6497
[INFO] Connecting to first OpenFlow server socket
[INFO] Failed to open socket to OpenFlow server: (Unix.Unix_error "Connection refused" connect 127.0.0.1:8984)
[INFO] Retrying in 1 second
[INFO] Successfully connected to first OpenFlow server socket
[INFO] Connecting to second OpenFlow server socket
[INFO] Successfully connected to second OpenFlow server socket
[INFO] switch 95073481681482 connected
[DEBUG] Setting up flow table
+-----------------------------------+
| 95073481681482 | Pattern | Action |
|-----------------------------------|
|                          |        |
+-----------------------------------+

 [INFO] switch 200171111126854 connected
 [DEBUG] Setting up flow table
 +------------------------------------+
 | 200171111126854 | Pattern | Action |
 |------------------------------------|
 |                           |        |
 +------------------------------------+
Generally the first of these is the Ithaca switch, and the second the NYC switch. Then edit the file
~/src/coscin-app/laptop_demo_network.json and
pop those dpid’s into the right switch attributes
{
  "ithaca": {
    "dpid": 95073481681482,
    "network": "192.168.56.0/24"
   },
  "nyc": {
    "dpid": 200171111126854,
    "network": "192.168.57.0/24"
  },
  "alternate_paths": [
    { "ithaca": "192.168.156.0/24", "nyc": "192.168.157.0/24" },
    { "ithaca": "192.168.158.0/24", "nyc": "192.168.159.0/24" },
    { "ithaca": "192.168.160.0/24", "nyc": "192.168.161.0/24" }
  ]
}
Running the Network
You must start up the VM’s in the following order, so that the network interfaces will be assigned correctly. You should run them all in separate terminal windows.
$ sudo bin/ithaca_up
$ sudo bin/nyc_up
$ sudo bin/router_up
Then you can start up Frenetic and the controller on the host (either in separate windows or, my favorite, through tmux):
$ fr
$ sw
To test the connectivity, login to either the coscintest-host-ithaca VM or the coscintest-host-nyc VM and ping the other:
ubuntu@coscintest-host-ithaca$ ping 192.168.57.100
ubuntu@coscintest-host-ithaca$ ping 192.168.157.100
Finally, to shut down VM’s, use the Ubuntu standard sudo shutdown now on each. I usually shutdown in the reverse order the VM’s
were started, but that’s probably not necessary.